Lolcat Sandman
I happened across a screendump of a 4Chan thread today that had lolcat pictures that matched up with the lyrics of Enter Sandman. Someone posted a comment saying that they’d love to see it with the soundtrack. So, I fired up iMovie and bingo: Lolcat Sandman.
Of course, the music copyright is owned by Metallica, but I actually had to go and buy it from iTunes because I’d deleted my “unofficially obtained” copy a while back.
UPDATE
Oh well, it was fun while it lasted. I got a takedown notice from Warner Music Group, via YouTube. I used the YouTube tools to remove the soundtrack. Sorry.
Gmail and MobileMe - Living Together in Perfect Harmony
UPDATE
June 7, 2012
This article is now 4 years old, and as such, is quite out of date. Google have since provided instructions for setting up your iOS devices, and MobileMe is due to be switched off on June 30, 2012. I will leave this article up, but you shouldn’t really follow any of the instructions any more!
I’ve been using Gmail for about 4 years now, and it’s pretty much become the centre of my email life, with my various email accounts being funneled into Gmail. I’ve used it with both the web client, and Mail.app on my Mac via IMAP, and have been pretty happy with both.
With the release of MobileMe and the iPhone 3G I made the decision to move to MobileMe (an Apple fanboi at heart, I wanted to keep it all within the one happy family - particularly seeing as work just bought me a MacBook Air.) But I was really reluctant to stop using Gmail as the repository of all of my email, both received and sent (awesome search, archiving and just to have a backup on another server).
It’s relatively easy to setup forwarding from Gmail through to MobileMe, which you then add to your mail client (Mail.app on the Mac) and the mail will come in as per normal. But this would mean that any sent items won’t appear in Gmail, which in turn means that Gmail is only storing half of the picture. But with adrianlynch doing most of the legwork, we were able to work out a solution.
There are quite a few little things that need to be done in order to fine tune the setup, particularly if you want to use multiple email addresses. I’ll cover those, and then get to the meat of the setup.
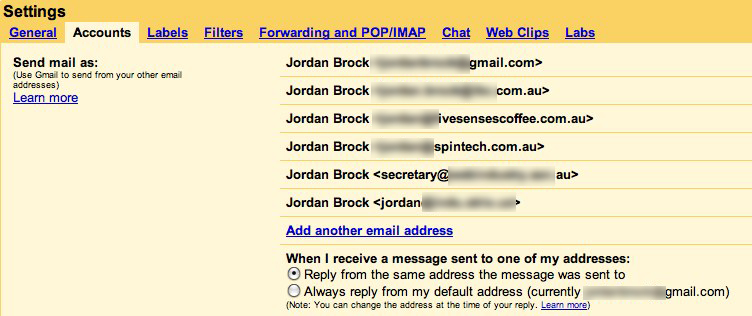
Multiple email addresses in Gmail.
Gmail has had the ability to support multiple email accounts for quite a while, and it all works quite well. First of all, sign into gmail, then go to the settings -> Accounts tab. The bet we’re interested in is the “Send Mail As” bit. You can add all of the email addresses you want to have gmail send email for in here. Gmail will send a confirmation email to the address you enter (just to make sure that you are in fact billg@microsoft.com).
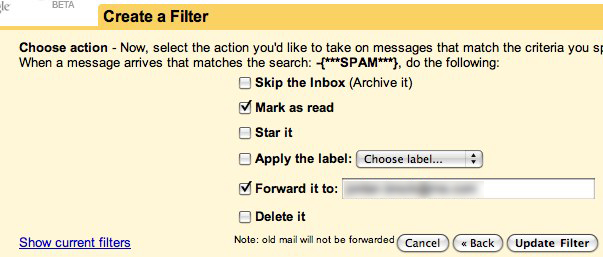
Setting up the email forwarding
There are two ways to forward email in Gmail. One is in the Settings -> Forwarding and POP/IMAP tab, which will forward every message to the address you specify. The other way is via a Filter (Settings -> Filters). I prefer to use the filter, because it allows me to get rid of some of the cruft mail that I don’t really ever want to see again (eg, one of my mail accounts flags spam as **SPAM** … if I didn’t setup a filter to not forward this, I’d receive all of those emails in MobileMe, which is sub-obptimal to say the least).
Setting up your computer
Of course, this assumes you’re using a Mac. If not, I’m sure you’re a smart enough person to work it out :)
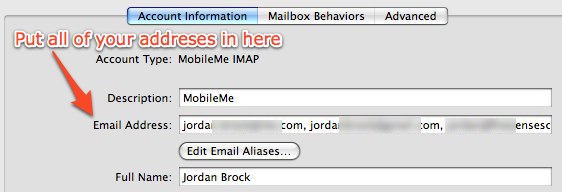
MobileMe setup
First up, add your MobileMe account. It’s pretty simple. Just enter your MobileMe account details (same as your old .Mac account), and it should all be jake.
If you’ve setup gmail to handle multiple email addresses, enter them all in the “Email Address” field, separated by commas.
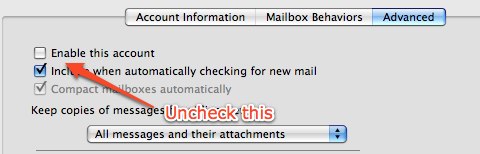
Gmail setup
Now, you need to add your gmail account to the system, as an IMAP account. Follow the instructions on the Google Help Center
Once you have added the account Mail.app will probably start downloading all of your mail from Gmail, which could take a fair while. This may or may not be something you want: your choice.
After the mail has all downloaded, go into the Advanced tab for the Gmail account in Mail.app, and uncheck “Enable this account.”
Then, go back into your MobileMe account and set the outgoing SMTP server to smtp.google.com. All of your sent mail will now go through Gmail, which is great for archiving purposes. Because MobileMe is an IMAP server, it will automatically be copied up to the MobileMe server (because it’s storing a copy in your Sent Items folder on your Mac), which means it’s then available on all the computers you use MobileMe with, including your iPhone / iPod Touch.
Why did I enter the multiple email addresses?
If you have multiple email addresses, and you entered them all in the “Email Address” box earlier, you will now have the option to choose which address to send your mail as when you create a new message.

There’s one little gotcha here, and it’s why I mentioned setting up the addresses from within gmail before. If you try to send a message from an email address that Gmail doesn’t “know” about, it will replace the sender email with your Gmail address. This is obviously to stop you spoofing your address, but it took me a little while to work that bit out. So, just make sure that you’ve defined all the addresses that you want to “Send As”
Setting up your iPhone / iPod Touch.
Once you have the above system up and working, you can basically mirror that setup on your iPhone. You need to create both accounts under “Mail, Contacts, Calendars” in the Settings application. Then disable the Gmail account, and set the outgoing SMTP server to gmail in the MobileMe setup.


If everything has gone according to plan, you should now have your Gmail “pushing” to your iPhone, and also appearing on your computer. And if you have multiple macs, and have sync turned on for “Mail Accounts” and “Mail Rules and Smart Folders”, then you will shortly have those settings on both of your computers.
Tom Waits
A great interview with Tom Waits (by Tom Waits himself) that includes this bit of gold:
Q: What's heaven for you?

A: Me and my wife on Route 66 with a pot of coffee,
a cheap guitar, pawnshop tape recorder in a Motel 6,
and a car that runs good parked right by the door.
Also, make sure you watch his performance of Chocolate Jesus on Letterman.
But I'm not installing ANYTHING!
Nice one Adobe.
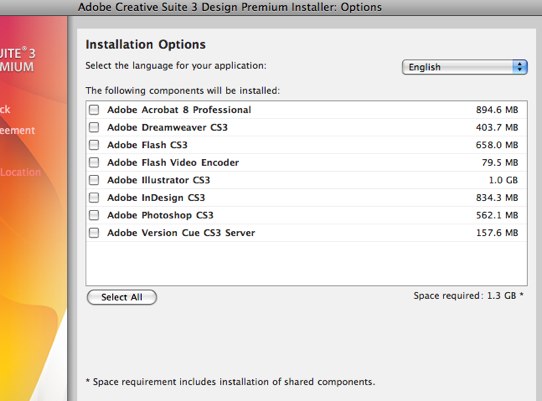
Check out the space required, particularly when I don’t have anything checked.
Freezing Rails with Git
Now that the Ruby On Rails team has moved the codebase over to github, some of the standard rake tasks aren’t working the way that they used to. When it was on SVN, it was possible to type
@rake rails:freeze:edge TAG=rel_2-0-1@
and the appropriate version would be copied into your vendor/rails directory.
Now if you do that, rake downloads a zip of the edge release. Which is fine and all, but sometimes you don’t want to be on edge … like in any production site.
So, I found a screencast that goes through the process, but I thought I’d actually put the text into a post, mainly for my own reference more than anything else.
$ rails path_to_app

$ cd path_to_app

$ git init

$ git submodule add git://github.com/rails/rails.git vendor/rails
At this point, git will effectively clone the repository, so that you can then choose one of the branches to “freeze” to. Type “git tag” to get a list of all the available tagged branches. Choose the one you want and type
@$ git checkout v2.1.0@
And that’s it. Slightly more involved than the old way, but still none too shabby.